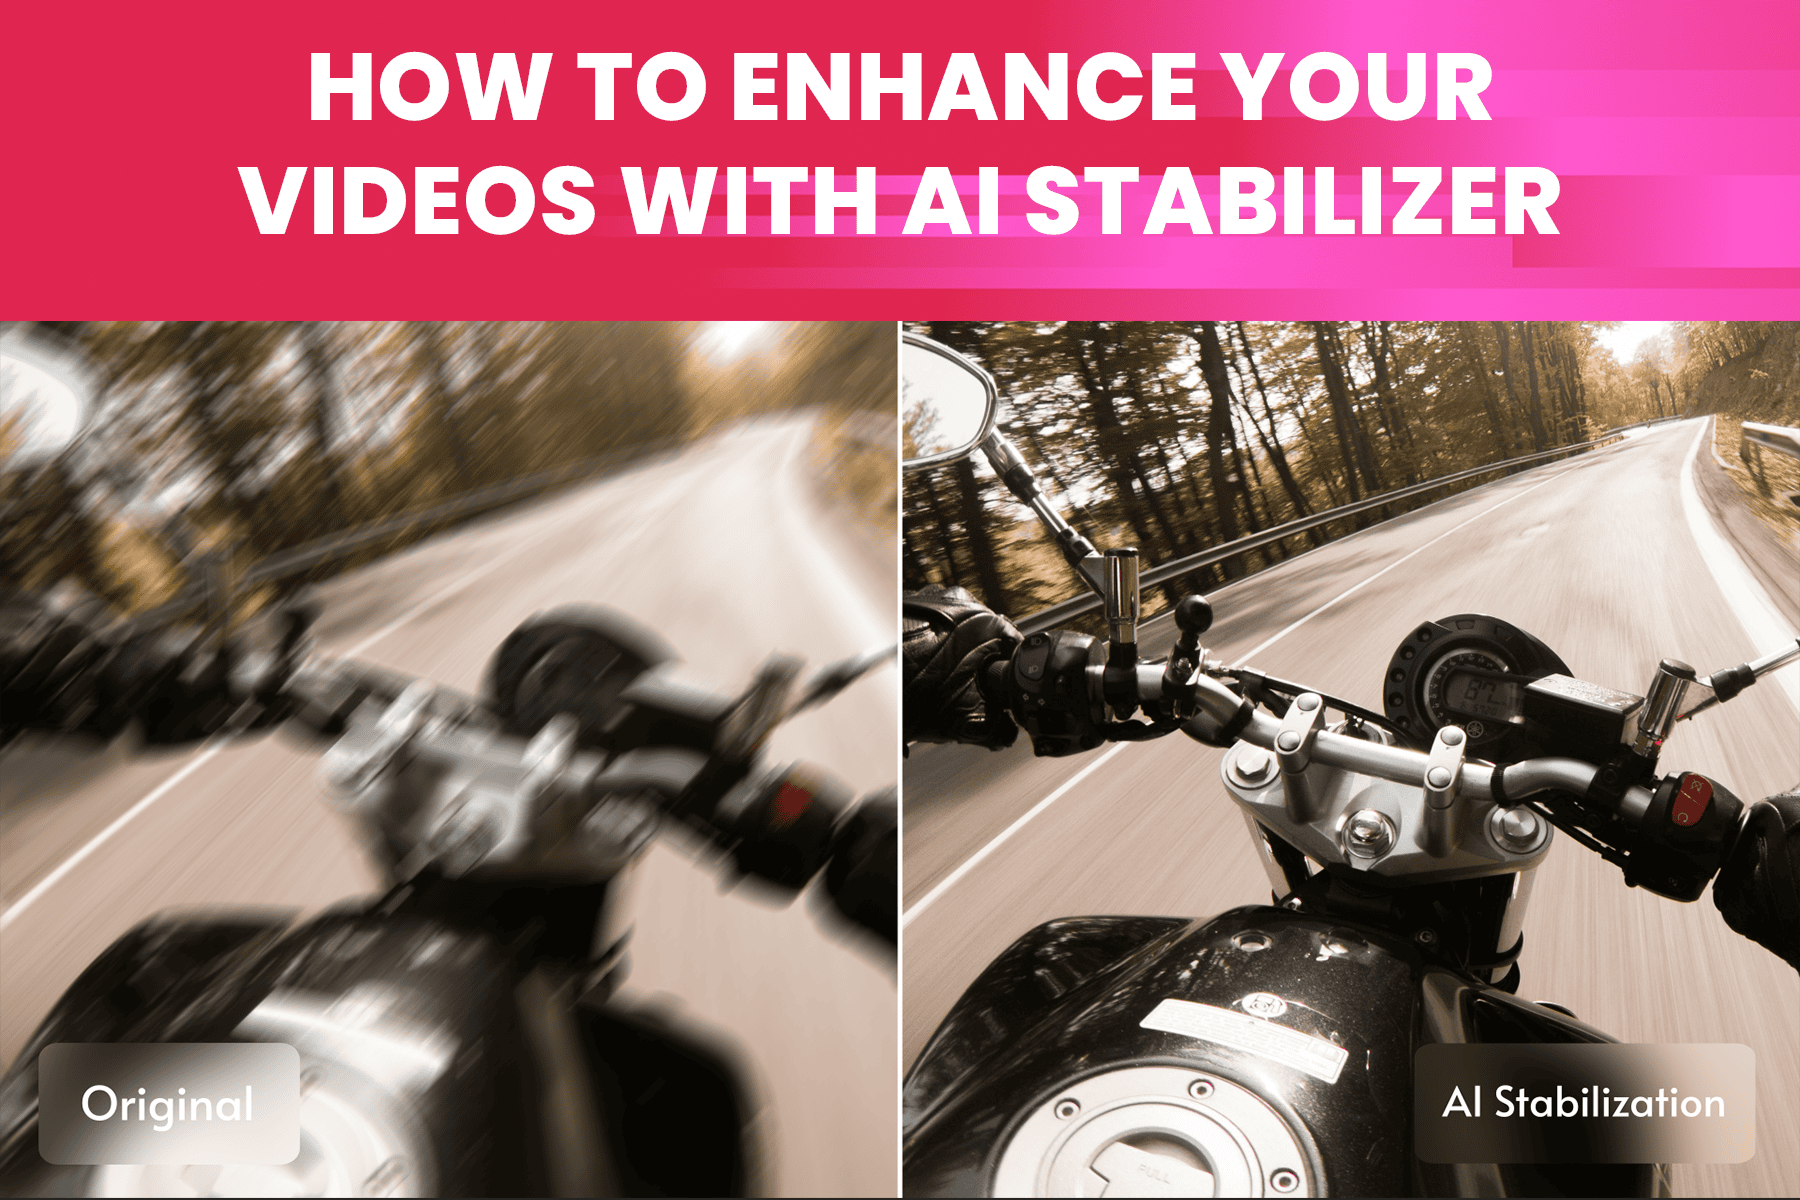
Pro tips: How to enhance your videos with AI stabilizer
Learn how video professionals can fix shaky footage using AI stabilization. Pro tips, best practices, and a step-by-step guide included.
Even the most experienced videographers encounter shaky footage, especially during handheld shoots, tracking shots, or fast-moving scenes. While traditional stabilization methods help, AI video enhancement now offers a powerful layer of post-production magic although video professionals still have a reserved attitude towards its use . Below, we share key tips to help you get the best results with AI stabilizers.
Why stable footage matters more than you think
The impact of video stabilization on viewer experience is significant. In fact, 87% of viewers are more likely to finish a video if the footage is smooth and stable. That is no surprise, as shaky visuals distract from the story, lower production value, and even cause discomfort. And yet, shaky footage is often unavoidable. Real-time action shots, like crowd movement, street scenes, or handheld tracking introduce natural camera shake. Even with careful planning, you might not notice the instability until playback. There is no need to go into panic mode, as you can find pro tips on how to fix this issue with AI stabilizer. But before diving into the how, let's break down the key reasons stabilization is crucial.
When to use AI video stabilization
AI stabilization minimizes unwanted camera movement and enhances the fluidity of your footage. Here are a few scenarios where it’s a lifesaver:
- Handheld camera shake: Shooting with phones or lightweight gear often introduces unintentional movement.
- Professional polish: Stabilized footage looks more cinematic and increases production value, especially important in film, documentaries, and branded content.
- Correcting during post-production: Even with gimbals or tripods, some shake sneaks in. AI stabilizers give you a second chance in post-production.
That said, understanding its limitations, and setting your shoot up for success is essential.
Pro tips to prepare for AI stabilization success
Here is how to maximize the effectiveness of AI video stabilization:
- Shoot with the widest lens possible. Avoid long lenses unless your camera has built-in stabilization.
- Avoid walking shots with unstabilized cameras. No AI can fully recover extreme motion from poor setup.
- Use both hands or a support system. One-handed handheld footage will always look handheld, and AI can only do so much.
- Keep the environment calm. If the entire frame is in motion (e.g., trees shaking, chaotic movement), stabilization tools may struggle to detect and correct camera shake.
Bonus tip: This rule also applies to AI video upscaling and other enhancement tools as explained before. Good input means great output.
Understanding stabilization tech: EIS, OIS, and AI
Before we go into the more practical explanation on how to enhance your videos with AI stabilization it’s worth mentioning that you also have some popular types of video stabilization equipment:
Electronic image stabilization (EIS): A software technique that compensates for camera shake by analyzing the footage in real-time and making incremental adjustments. Commonly found in smartphones and action cameras.
Optical image stabilization (OIS): A hardware based technique that uses physical mechanisms, such as gyroscopes and accelerometers to prevent camera shaking. Often incorporated into high-end cameras and lenses, but it adds more weight to overall equipment.
How to stabilize videos using AI (Step-by-step)
Using AI stabilization demands knowing that fully unstable video will affect the overall results and it should be necessary precautions used as explained above. However, if the unstable footage appears it can be treated using TensorPix. Follow the steps in our practical guide:
- Log on using the Enhance button. Afterwards you will find an intuitive, step-by-step interface designed to simplify the video enhancement process.
- Upload one or multiple videos facing stabilization issues.
- In case that the video has lower resolution or additional artifacts of some kind you can get satisfactory results using the AI video upscale filter.
- When ready, select the ShakeFree filter. Use the Free Preview option to test 10 seconds of footage and adjust the intensity as needed.
- Finalize enhancements before applying the stabilization filter on the full video length.
- Customize output settings by selecting resolution (2K, 4K), codecs (H264, H265/HEVC or ProRes), and file formats in Advanced setting
- Select the output video extension and download the enhanced video. You will receive an email notification once the enhancement is complete.
Conclusion
AI video stabilizers like TensorPix can drastically improve your production quality when used correctly. The key is preparation, understanding the tool’s capabilities, and testing your footage before applying the full effect.